Tuesday, June 29, 2004
By: Jason Doucette
February 24, 2007 Update: Visual Studio .NET 2003 Service Pack 1 has been released. Since this fixes Visual C++ 2003 Standard compiler bugs, it begs the question: Should I: A. Upgrade Visual C++ 2003 Standard to SP1, and use the newly fixed non-optimizing compiler? B. Not upgrade to SP1, and continue using the optimizing compiler of Visual C++ Toolkit 2003? C. Upgrade to Visual C++ 2005 Express Edition, which contains an "enhanced version of the C/C++ optimizing compiler", which obsoletes all Visual C++ 2003 versions, except that it does not include ATL or MFC? D. Possibly trick the SP1 installer into upgrading the Visual C++ Toolkit 2003's optimizing compiler? Please follow / join the discussion on our forums.
May 18, 2006 Update: The Visual C++ Toolkit 2003 has been replaced with Visual C++ 2005 Express Edition, which is also free. This page states, "Visual C++ 2005 Express Edition also contains an enhanced version of the C/C++ optimizing compiler for the fastest executables." This makes Visual C++ 2003 Standard and Visual C++ Toolkit 2003 obsolete, except that Visual C++ 2005 Express does not include ATL or MFC. Also, since it not desirable to upgrade Visual Studio during mid-project, you may still want the Visual C++ Toolkit 2003. Thus, we have it available for download off Uploading.com:
Download: VCToolkitSetup(v1.01)(2004.07.06).zip (Uploading.com)
Download: VCToolkitSetup(v1.01)(2004.07.06).zip (Xona.com)
Anyone who has purchased Microsoft Visual C++ .NET Standard Edition (version 2002 or 2003, a.k.a. version 7.0 or 7.1, and VC7), which is much cheaper (estimated retail price: $109 USD) than the entire Microsoft Visual Studio .NET Professional Edition package (estimated retail price: $799 USD), has been annoyed that it does not come with the optimizing compiler. You need not worry anymore. Microsoft has released the Visual C++ Toolkit 2003 for free, which includes "the same compiler and linker that ship with Visual Studio .NET 2003 Professional!"
How do I instruct Visual C++ .NET Standard to use the Optimizing Compiler?
Download and install the Visual C++ Toolkit 2003. Take a look in the 'bin' directory from its install location:
C:\Program Files\Microsoft Visual C++ Toolkit 2003\bin
You should see five files that start with 'c'; they are the compiler files:
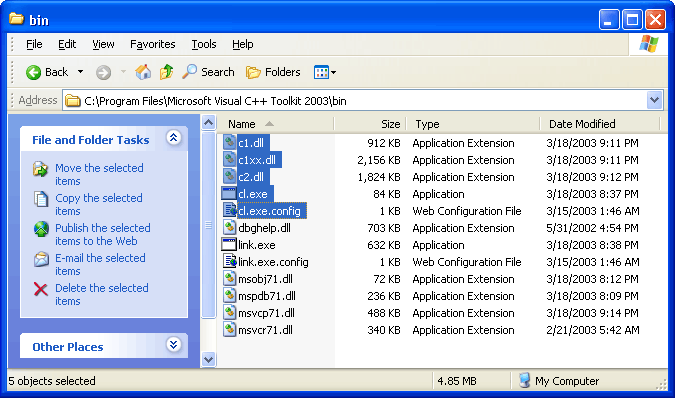
- c1.dll
- c1xx.dll
- c2.dll
- cl.exe
- cl.exe.config
These are the files you want the GUI to use now, instead of the versions it is currently using. Take a look in the 'bin' directory of your Visual C++ .NET Standard Edition install location:
C:\Program Files\Microsoft Visual Studio .NET 2003\Vc7\bin
You should see these same five files. These are the files the GUI is currently using. There are two ways to instruct the GUI to use the files from the Toolkit:
- Method One (preferred):
Go into Tools -> Options... -> Projects folder -> VC++ Directories. Under 'Show directories for:', select 'Executable files'. Insert the Visual C++ Toolkit's bin directory (C:\Program Files\Microsoft Visual C++ Toolkit 2003\bin) at the top, so these files are found first and used, when the GUI starts looking for them.
- Method Two:
Make a backup copy of the Visual C++ .NET Standard Edition files, and then overwrite them with the Visual C++ Toolkit files. The next time you compile, you will be using the optimizing compiler. I should note that on Brian Johnson's article regarding the Toolkit, Pheo stated that it was not necessary to overwrite the c1*.* files. I have found overwriting them has causes no problems. If they ever do, you can restore the originals from the backup copies.
The .NET Standard GUI still grays out the Optimizing Switches.
You are going to find that Visual C++ .NET Standard's GUI is still going to have the optimizing compiler switches grayed out:
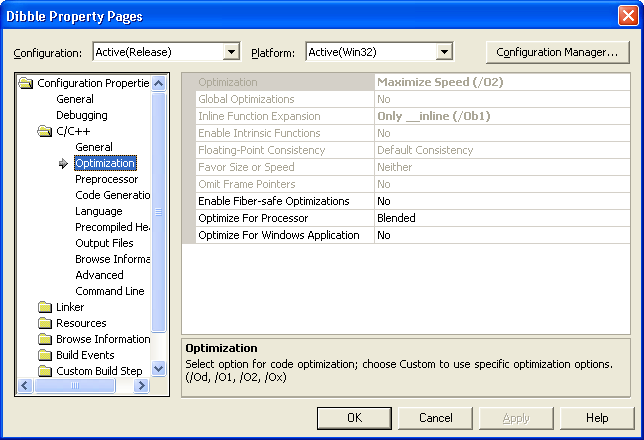
This is not a problem thanks to the 'Command Line' option under the 'C/C++' folder within this same window. Simply look up the compiler options, and add them here. Be sure that you add these to your release build, not your debug build. If you were to try this with the original non-optimizing compiler, it will complain about the unsupported switches. If it does not complain, then you are successfully using the optimizing compiler.
Purchase the much cheaper Visual C++ .NET Standard Edition
There is now little reason to spend eight times the price for Visual Studio .NET Professional, when the optimizing compiler is freely available, and can be installed easily using my explanation above.
Microsoft Visual C++ .NET
Standard Edition 2003
Which Additional Switches do you Recommend?
Firstly, there are many optimization switches that are available via the GUI within Visual C++ .NET Standard Edition, such as /G7 (Optimize for Processor), which optimizes the code for the Pentium 4 and Athlon processors, but still creates an executable backwards compatible with older processors. I would recommend that you look through and see what you can change without requiring the manual addition of parameters to the command line. Once you have done this, I recommend the following for the command line:
- /O2 - Maximize Speed: This switch is identical to using the following switches: /Og, /Oi, /Ot, /Oy, /Ob2, /Gs, /GF, and /Gy. This is set by default in the Professional Edition for release builds.
- /arch - Minimum CPU Architecture: Use this if you know for certain the application will only be run on systems that minimally support Streaming SIMD Extensions (SSE) or Streaming SIMD Extensions 2 (SSE2). Note that the resultant executable will not run on a CPU that does not minimally support the instruction set you specify.
For further reading, the following two articles will give you some additional information on optimization switches, and what they accomplish:
Problems and Recommendations
In the Project -> Properties, under Configuration Properties -> General, there is a switch that is already enabled from the Standard Edition GUI called 'Whole Program Optimization'. It defaults to 'No', and the explanation text does not indicate any compiler switch that this selection may represent. I would assume that this represents the /GL (Whole Program Optimization) switch. If you set the selection to 'Yes' and compile, you will notice in the build log that the GUI does not pass the /GL parameter to the compiler. If you want this switch (it is recommended for release builds), then you must add it manually to the command line parameters. In general, it is beneficial to look up each compiler switch to understand its effects, and it may be easier for some people to merely add them all to the command line manually.
Minimizing Code Size
When code size is a concern, you should use the /O1 (Minimize Size) switch (which is identical to using the following switches: /Og, /Os, /Oy, /Ob2, /Gs, /GF, and /Gy). For multithreaded applications, the most effective way to reduce the size of the resultant executable is to use the /MD (Use Run-Time Library) switch which creates a multithreaded, dynamic linking executable file using MSVCRT.LIB (which requires the existence of MSVCP71.DLL to run), as opposed to using the regular /MT (Use Run-Time Library) switch which creates a multithreaded, static linking executable file using LIBCMT.LIB. For an example of the decrease in executable size, my current project was reduced from 216 Kb to 144 Kb when I switched from /MD to /MT.
Please note that an application that is dependent on MSVCP71.DLL must redistribute it in the directory containing the executable. When you do this, the size of both the executable and the .dll file are likely larger than if you just used the regular /MT (Use Run-Time Library) switch. However, in the case of Visual C++ 6.0 users, the run-time library is installed by default on Windows 98 / Windows NT and above, so the .dll distribution is not required.
Visual C++ 6.0 Users
On a recent K-v-R thread, 'texture' and Stefan Kuhn mentioned a way to incorporate the optimizing compiler in Visual C++ 6.0 Standard Edition. The method to accomplish this is similar to the first method explained above (the addition of directory paths), except for one thing. The optimizing compiler needs access to its own lib and include folders (in addition to the bin directory) that were create during the install of the Visual C++ Toolkit 2003. Therefore, you need to add all three of these following directories to the appropriate directory lists:
C:\Program Files\Microsoft Visual C++ Toolkit 2003\bin
C:\Program Files\Microsoft Visual C++ Toolkit 2003\lib
C:\Program Files\Microsoft Visual C++ Toolkit 2003\include
You can make the compiler aware of these folders by adding them to the top of the directory lists, so they are searched first. Do this by going into Tools -> Options -> Directories tab. Note that you will need to make a different selection under 'Show directories for:' each time you add a path. Add the bin directory to the 'Executable files', add the lib directory to the 'Library files', and add the include directory to the 'Include files'. You must ensure that you make these paths the first path in the list, so when the GUI seeks out its required files, it will find the files in these directories first, instead of the original files in the original locations.
Visual C++ 6.0 Problems
I advise you to read the K-v-R thread mentioned from this point onward, as it mentions numerous potential difficulties you may run into. There is also a thread on GameDev.net that you may like to read. I will summarize a few problems below, but I cannot guarantee that your programs will compile even if you take heed the points I mention. The best you can expect is that they will compile, but you will still lose the use of your debugger. Ihighly recommend upgrading to the cheap version of Microsoft Visual C++ .NET 2003 (VC7) Standard Edition, as you will have no problems installing and using the optimizing compiler with it.
Stefan Kuhn has pointed out that if your program links to the multithreaded DLL run-time library (MSVCRT.LIB), there will be linking errors. Specifically, for any double to long conversions, the optimizing compiler will generate code that references the _ftol2 function. The linker will fail with the error: "unresolved external symbol __ftol2" (the extra underscore in the error report is due to "name mangling"; the compiler adds an underscore to exported / external function names). The solution is to link to the static C run-time library, instead of the multithreaded DLL run-time library. For multithreaded applications, this is LIBCMTD.LIB for debug mode, and LIBCMT.LIB for release mode (the multithreaded versions of LIBCD.LIB and LIBC.LIB, respectively). Ensure that you are linking to the static C run-time libraries for both debug and release builds.
When you compile for debug mode, calls to run-time checks will be inserted that reference functions beginning with __RTC. The linker will fail to link these functions if you are linking with the multithreaded DLL run-time library (MSVCRTD.LIB) or the multithreaded static C run-time library (LIBCMTD.LIB).
If your program is targeted for Windows ME or above (when WINVER has been set to 0x0500 or higher), you should not have these problems. However, if your program is targeted for Windows 98 or earlier (when WINVER has been set to a value below 0x0500), the functions mentioned will not be implemented in certain run-time libraries, and the linker will complain if you attempt to use them.
About the Author: I am Jason Doucette of Xona Games, an award-winning indie game studio that I founded with my twin brother. We make intensified arcade-style retro games. Our business, our games, our technology, and we as competitive gamers have won prestigious awards and received worldwide press. Our business has won $190,000 in contests. Our games have ranked from #1 in Canada to #1 in Japan, have become #1 best sellers in multiple countries, have won game contests, and have held 3 of the top 5 rated spots in Japan of all Xbox LIVE indie games. Our game engines have been awarded for technical excellence. And we, the developers, have placed #1 in competitive gaming competitions -- relating to the games we make. Read about our story, our awards, our games, and view our blog.